Anybody out there tired of water puddles under your glass, and having a mess to clean up afterwords? Yeah, me too. Arrrrr! One of those little pet peeve things, right? :) Well, we just recently moved and in all the unpacking... our coasters were no where to be found. We have been in dire need of something to catch those pesky little puddles. Since I couldn't find any cute ones in stores, I decided that I would make some of my own...
Yay! Another excuse for a project! ;)
A few years ago I saw some super cute quilted coasters in a magazine
and wanted to try them. So off to the sewing machine I went!

These were a fairly simple sewing project and turned out great, thanks to a wonderful suggestion from my husband... I was having a hard time choosing what fabric to use and then he suggested that I do seasonal coasters! How fun... Honey, you are awesome, thanks for the idea! They were exactly what I wanted :) These are perfect for using up those little scraps of material that you don't know what to do with.
I was working on a tutorial for these but then, after I had almost finished mine I found this wonderful tutorial on how to do them. It was very similar to the method that I used, with some slight variation. But I loved her tutorial so I wanted to share it with all of you :)
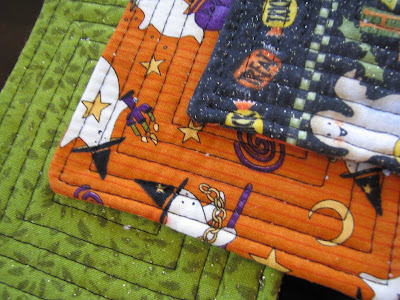
Here is a close up of the backs of the coasters.
Love the fun fabric that I found.
If anyone is wondering... I found this super cute fabric at Joanne's.
They have a very large selection of holiday prints right now :)

Here's a close up of the front. This is something that I did do differently than Cheryl... She did seperate squares all the way to the center, I just followed with my sewing machine all the way around in a constant stitch to the center,
which I think might make it a little faster, but either looks really good :)

After laying all of my fabric out I realized that I really wanted to see all the fun prints that I found in each coaster :) So, for a littleVariEty...
I decided to do a pieced top (a little more work but I think that they turned out to be worth the effort!) Since the top was pieced I chose to have one type of fabric on the back
and they were different prints so they wouldn't all have the same look.

So I cut four pieces for the top of each coaster,
laying them all out next to each other making sure that there weren't any pieces the with the same pattern next to each other...

I Separated them into piles for each coaster...

Then I took two pieces from each pile of four (only one set at a time)
Then I pinned the right sides together, sewing down the side to make a seam.

With right sides together pin the two pieces you have just sewn,
matching up from the center seam and sewing the two pieces together
(remember you are going for a patchwork look here).

From there you can follow along with Cheryl's tutorial. Sewing together the front and back panel along with the batting (or in my case I just used some left over terry cloth).
And finishing them off with your sewing machine.
I did use a iron as I went to make to help all the seams lie flat,
always very good tool if you want your projects to look nice and crisp.
And it always makes the sewing go a little easier
"SEW" cute and fun to have out for company...

Or for EveRyDAy use!
You can even tie them up with a cute ribbon and give them as a gift...
Even Better!

I will definitely be making more of these for the upcoming holidays.


Those are so cute, I love how each one has four different fabrics. Thanks for the extensive tute.
ReplyDeleteThose are totally cute! You did a really good job on them!
ReplyDeleteSuper cute! Great job!
ReplyDeleteThese turned out great!! I really love the fabrics you chose. I made these using Martha's tutorial last year for Christmas and mine were SO not that cute. You rock!
ReplyDeleteThese are great!
ReplyDeleteVery cute! I have made a few of these myself but not as cute as yours!
ReplyDeleteI love these! So cute. It would be great to have a set for each season. Thanks for linking up at My Backyard Eden!
ReplyDeleteCute coaster! i will make for fall, thanks for sharing.
ReplyDelete