background

Monday, October 11, 2010

Super Cute Halloween Coasters!

Anybody out there tired of water puddles under your glass, and having a mess to clean up afterwords? Yeah, me too. Arrrrr! One of those little pet peeve things, right? :) Well, we just recently moved and in all the unpacking... our coasters were no where to be found. We have been in dire need of something to catch those pesky little puddles. Since I couldn't find any cute ones in stores, I decided that I would make some of my own...
Yay! Another excuse for a project! ;)

A few years ago I saw some super cute quilted coasters in a magazine
and wanted to try them. So off to the sewing machine I went!


These were a fairly simple sewing project and turned out great, thanks to a wonderful suggestion from my husband... I was having a hard time choosing what fabric to use and then he suggested that I do seasonal coasters! How fun... Honey, you are awesome, thanks for the idea! They were exactly what I wanted :) These are perfect for using up those little scraps of material that you don't know what to do with.

I was working on a tutorial for these but then, after I had almost finished mine I found this wonderful tutorial on how to do them. It was very similar to the method that I used, with some slight variation. But I loved her tutorial so I wanted to share it with all of you :)

Here is a close up of the backs of the coasters.
Love the fun fabric that I found.
If anyone is wondering... I found this super cute fabric at Joanne's.
They have a very large selection of holiday prints right now :)
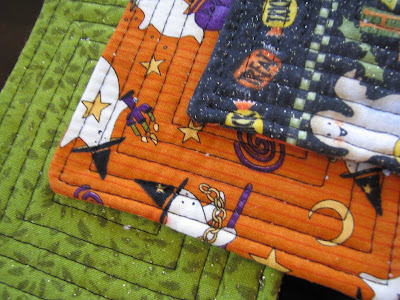

Here's a close up of the front. This is something that I did do differently than Cheryl... She did seperate squares all the way to the center, I just followed with my sewing machine all the way around in a constant stitch to the center,
which I think might make it a little faster, but either looks really good :)


After laying all of my fabric out I realized that I really wanted to see all the fun prints that I found in each coaster :) So, for a littleVariEty...
I decided to do a pieced top (a little more work but I think that they turned out to be worth the effort!) Since the top was pieced I chose to have one type of fabric on the back
and they were different prints so they wouldn't all have the same look.

So I cut four pieces for the top of each coaster,
laying them all out next to each other making sure that there weren't any pieces the with the same pattern next to each other...


I Separated them into piles for each coaster...


Then I took two pieces from each pile of four (only one set at a time)
Then I pinned the right sides together, sewing down the side to make a seam.


With right sides together pin the two pieces you have just sewn,
matching up from the center seam and sewing the two pieces together
(remember you are going for a patchwork look here).


From there you can follow along with Cheryl's tutorial. Sewing together the front and back panel along with the batting (or in my case I just used some left over terry cloth).
And finishing them off with your sewing machine.

I did use a iron as I went to make to help all the seams lie flat,
always very good tool if you want your projects to look nice and crisp.
And it always makes the sewing go a little easier

"SEW" cute and fun to have out for company...


Or for EveRyDAy use!


You can even tie them up with a cute ribbon and give them as a gift...
Even Better!


I will definitely be making more of these for the upcoming holidays.

I will make sure to show them off as I get each new season done :)

linking up to:

UndertheTableandDreaming

Photobucket

http://thediyshowoff.blogspot.com/

Make it Yours @ My Backyard Eden

Sunday, October 10, 2010

Re-fashioned tank top for $1.75

I found this tank top on clearance at Target for $1.75. I bought and XL even though I usually wear a MED so I would have extra fabric for embellishing.

Then I took the sides in so it would fit me like this:


Then I cut the extra fabric into strips and sewed them across the front. Here is the finished product.


I got the idea from this J-Crew knock off but I wasn't feeling a bow so I did it without.


That's my "Happy to have a new shirt in my wardrobe" face. :)


linking up to these parties:

All Thingz Related Making

Make it Yours @ My Backyard Eden

http://www.thegypsyscorner.com/


Tuesday, October 5, 2010

T shirt re-fashion for under $5


I got this shirt on clearance at Target for $3.
And this dress at a thrift store for $5 (but I am using more than half of the fabric on another project so stay tuned :)


I got the inspiration for this project here (includes an awesome tutorial)


Bring on the cold weather, I am ready! (although I will probably have to retire the capri's for the season :(

Linking up to these parties!


Make it Yours @ My Backyard Eden
giveaways
Beyond The Picket Fence


Get your craft on Thurs.


Katie's Nesting Spot
HookingupwithHoH

Sunday, October 3, 2010

Chicken Tetrazzini (freezer cooking recipe)


2 cups cooked and cubed chicken

1 (8 oz.) pkg. spaghetti, cooked

1 medium green pepper, chopped

1/4 cup butter, melted

2 1/2 Tbsp. flour

1 cup milk

1 can cream of mushroom soup

1 (4 oz.) can sliced mushrooms, drained

1 (2 oz) jar diced pimento

1/8 tsp. garlic powder

3 cups shredded cheese, divided


If you will be using my freezer cooking method multiply this recipe according to the size of your family and the amount of times you want to eat it. I multiply it by 6 and it makes 9 meals for my family of 3.

Directions:

Saute green pepper in butter until tender. Add flour and stir well. Stir in milk, next 4 ingredients, and 2 cups cheese. Cook over medium heat, stirring constantly, 10 minutes or until thoroughly heated. Stir in chicken. Stir in spaghetti. Transfer to 9x13 inch baking dish (or freezer container) and top with remaining cheese.

If you will be eating right away bake at 350 degrees for 15 minutes.

Freezer instructions: I suggest freezing in an aluminum container that you can stick right in the oven. On serving day you can re-heat in one of two ways. 1) Thaw completely and then bake at 350 degrees for 30 minutes or 2)Without thawing bake at 325 degrees for 2 hours.


Recipe from my friend Kay Webster

Monday, September 27, 2010

Halloween Jars-a tutorial plus down loadable file


If you want to make it easy on yourself and save a trip to the store we have a few kits available on Ashley's Etsy site here. All you will need to provide is the jars and the mod podge (or clear drying Elmer's glue).

What you will need:

-5 canning jars of various sizes

-A sheet of black vinyl paper

-tissue paper (we used white, orange, purple and green)

-black electrical tape

-mod podge (or clear drying Elmer's glue)

Step one:

If you like the faces we used you can download this file and print them off.

If you need to re-size the images you will want to download the faces individually, open them in a word document, then click a corner and drag to make it bigger or smaller. Or if you want, just draw up some of your own.

zombie face

pumpkin face

frankenstein face

ghost face 1

ghost face 2

Step two:

Paint the inside of the jars with mod podge (or clear drying Elmer's glue)


Step 3:

Cover the inside of the jar with the tissue paper. Hint: it's easier if you choose a jar that your hand can fit into :) We used some that were smaller and it was a little more tricky.


Step 4:

Trace the faces on your vinyl.

You don't need to cut out each individual piece before tracing it. If you just lay the image on top and put medium pressure it will make an indentation that you can cut around.


Step 5:

Wrap the black electrical tape around the lid ring on each jar.

Step 6:

Stick the faces on the front of the jars.

Step 7:

Once the mod podge has dried, trim the excess tissue paper from the top and put the lid on.Note: If you trim the paper too short it will stick out of the top of your jar when you are done. If you leave it too long it will stick out under the lid. So I guess I am saying you should trim it to just the right length. he he.

Step 8: (optional)

String some Christmas lights in and around the jars to light 'em up!


AND


MakingPhotobucketBWS tips buttonmmm buttonAll Thingz Related Make it Yours @ My Backyard EdenCreations by Kara


giveaways

Also participating in Get Your Craft On